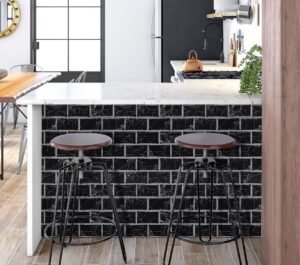
A peel and stick backsplash kitchen can be the perfect way to add more style to your kitchen without breaking the bank. The best part about them? They’re so easy to install that you can do it on your own, so you won’t have to pay extra money to hire a professional contractor.
Why choose peel and stick tiles?
Peel and stick tiles are a quick, easy, and inexpensive way to transform your kitchen. Peel and stick tiles can turn an old bathroom into a stylish space. You no longer have to be an expert tile layer- peel and stick tiles make installing them so easy that any homeowner can do it! Peel & Stick backsplashes are made with sturdy, wear-resistant materials so they can withstand just about anything you dish out at them.
Helpful Tips Before You Start
- Wear clothes you don’t mind getting dirty or ones that can be ruined by adhesive. You’ll be trying to avoid wearing cotton because it might get sticky from the adhesive. (clothes, adhesive)
- Review some tutorials on how to install a peel and stick backsplash, which you’ll find online as well as in many craft stores (tutorials, web)
- If you’re doing more than one wall make sure they are cut at even intervals so that they fit perfectly with each other (cut, even)
- Be sure to measure twice before you start laying down any tiles because if they don’t align, there is not much room for adjustments afterwards (measure twice, alignments)
Step 1: Prep your wall surface
Make sure that your kitchen walls are clean, as this will make it easier for the tiles to stick properly. There are several ways you can get rid of dirt or grease on your kitchen walls, including using surface cleaner and paper towels, sponges, or even rubbing alcohol. Once your wall is clean and dry, measure out where you want your peel-and-stick backsplash tile installation. Remember to leave a bit of room around the perimeter of each tile if you want them installed at an angle.
Step 2: Measure your space
Measure your wall space for an accurate peel and stick backsplash design. With your peel and stick backing already selected, find out how many tiles will fit comfortably on each wall. You’ll need this number when you’re ready to purchase materials. Next, measure the height of your cabinets with their doors open so you know how high up you can go with a vertical pattern. Finally, take note of any details that may affect installation such as outlets, ceiling fans, doorways or any other obstructions near the wall or flooring in which you’ll be installing peel-and-stick tiles.
Step 3: Create your design plan
To install your peel and stick backsplash, begin by preparing your surface. For example, cleaning it with soap and water is an important step. Make sure you have all of the necessary tools handy too: measuring tape, pencils, ripper or scraper. Next, measure out how much of your wall you want covered and cut out any holes for switches or outlets. Once everything is squared away, go ahead and apply your first strip of tiles!
Step: 4 Install your first row of tile
We recommend installing your first row of tile with mortar, as it provides a stable surface for the tiles. First, line up your first row of tiles on top of the painter’s tape you put down to cover your entire backsplash area. It helps if you work from an edge (like where your countertop meets the wall) or a corner so that you can create perfect angles using math skills.
Step 5: Finishing your last row of tile
As you finish your last row of tile, you’ll notice there will be one or two tiles with an L cut out. These are for the cuts of tile which go over appliances or trim work. The L shape is important because it leaves enough grout space around the edge of the peel and stick backspip, ensuring that any debris caught in grout lines will not scratch surfaces. To cut this final piece on a 45 degree angle, place the top point of your tiling saw on where you want your cut to be located. You’ll notice that placing it about 1/4 from an end creates an L-shape for correct placement later on.
Step 6 – Applying Grout to Your Tiles
Lastly, we’re going to use a damp sponge or mop soaked with warm water to evenly apply grout over the top of each tile. Grout is similar to cement or mortar that is used between tiles and will help seal the installation. Work from one side of your kitchen island countertop towards the other, filling any cracks that have developed while installing your peel and stick backsplash kitchen tiles. We recommend applying grout before you start if possible, so you don’t end up inadvertently spilling grout on your newly installed backsplash at some point during installation.